In the autumn of 2025, I found myself hunting for a privilege escalation on a pretty default Lenovo endpoint. Upon inspecting elevated processes and their actions, I found that Lenovo Vantage, specifically an elevated add-in, wrote log files into a directory I had full control over. This led me down the rabbit hole of Lenovo Vantage and its add-ins. While this specific case did not turn out to be a vulnerability, I found a total of four (4) other vulnerabilities in Lenovo Vantage add-ins.
In this post, I’ll dump the knowledge and tools I’ve gathered around Vantage into a somewhat re-usable post in the hopes it’ll aid others in future security research, as I do not think Vantage has been fully explored. The tooling is released in github.com/rtfmkiesel/advantage↗.
This research, especially the authorization part of Vantage, builds upon previous research by Atredis↗.
What the Vantage #
Lenovo Vantage, also distributed as Lenovo Commercial Vantage is software, that comes preinstalled on Lenovo devices running Windows. Its main goal is to give the end-user quick or easier access to certain system settings or IT-administrative tasks. It also displays information about the hardware, warranty & co. On the enterprise side, it can be used for fleet-management enabling companies to check which devices need replacing, etc.
Vantage itself is mostly written in C#, with certain DLLs being written in C++. It does not seem to be obfuscated. The software does not come in one single package. Rather Vantage uses an add-in system. Lenovo itself distributes those add-ins and selects, based on your computer model, which add-ins you get. More on those later.
The core of the software is LenovoVantageService running elevated as NT Authority/SYSTEM. The UI is a WebView2↗ application running with the privileges it was started with. The UI communicates to the service via RPC.
Some important directories include:
C:\Program Files (x86)\Lenovo\VantageServicecontaining the Service itselfC:\ProgramData\Lenovo\Vantage\Addinscontaining the add-insC:\ProgramData\Lenovo\Vantage\Logscontaining logs if enabled
RPC Communication #
The components of Vantage communicate via RPC. This RPC server is started by the main service, LenovoVantageService. It has one endpoint, 8EEFA2E8-D033-4A08-A484-139C0B09371D1, and is only available locally (ncalrpc) as seen by the RPC dump:
Protocol: N/A
Provider: N/A
UUID    : 8EEFA2E8-D033-4A08-A484-139C0B09371D v1.1
Bindings:
          ncalrpc:[8EEFA2E8-D033-4A08-A484-139C0B09371D]
          ncalrpc:[OLE93C14DB8AC2B83C2524D43343B3B]
          ncalrpc:[VantageCoreAddin.12e7a260ba8f4c8fa7ed67f758bf34ed]
          ncalrpc:[OLEC6072B592FFC390FA1DE0592C111]
          ncalrpc:[GenericMessagingAddin.495189d6d6f64414996cd3307aa31d1d]
          ncalrpc:[OLEE079A7A3B6447A11FEA01C8BBA45]
          ncalrpc:[LenovoServiceBridgeAddin.2d0984fefa4f4597b3966e1993214dee]
          ncalrpc:[OLE48F66406FDC6F0E712913BC89CBF]
          ncalrpc:[E046963F.LenovoSettingsforEnterprise_k1h2ywk1493x8.me.39]
          ncalrpc:[OLE7A1A16E53462E82EA026CF909CC2]
          ncalrpc:[GenericTelemetryAddin.e7168e646b004cadb43cc7526290bb59]
          ncalrpc:[OLE41AAFBA5E0AA7D5CDEA8D7AE84FC]
          ncalrpc:[ThinkSmartSenseAddin.e625b6ba86eb4261ac1fc741512b4d5f]
          ncalrpc:[OLE4E5F34F44D84C2CDD931C381BCF9]
          ncalrpc:[SmartNoiseCancelledAddin.b145b5b794a04bdf9f24eca1b45ca4ff]
          ncalrpc:[OLEE1AA1835304A31AE95EEE0FD1564]
          ncalrpc:[CommercialAddin.7c583902b96c46c8b8a2a111bb1b2fc0]
          ncalrpc:[OLE998253D1E0FC1CD27CFA5F7EEA2F]
          ncalrpc:[SmartDisplayAddin.6c9cc418d32a4876a6ecc5221a2dd140]
          ncalrpc:[OLEAE498BDF918A39E2B7923C39F1DE]
You could talk to the server by implementing the RPC calls yourself. However, this is not needed as Lenovo provides a C# and a C++ shared library, which will handle them for you.
Inside C:\Program Files (x86)\Lenovo\VantageService, as well as in every add-in directory, you’ll find Lenovo.Vantage.RpcClient.dll. This is a shared library for C#, which gives you the option to use RpcClient and its MakeRequest. This is, however, just a wrapper for the C++ DLL VantageRpcClient.dll which can be found in the x64 and x86 subdirectories of the service and again, each individual add-in.
Either way, making such a request requires two arguments. First, there is the endpoint UUID, and second, there is the request string. Such a request string is a JSON object that has the following structure:
{
  "contract": "",
  "command": "",
  "payload": {}
}
The contract value defines the target for the request. This is the “sub-component” of Vantage, which should receive the request. command is the code flow or function you want to execute within the contract. A contract usually has multiple commands. And finally, payload is simply another JSON structure that is defined by the function that processes your request.
The RPC server does not accept connections from anywhere, as Lenovo implemented a form of authorization. The RPC client’s PID has to be from a trusted binary. In this case, trusted means, among other things, it has to be signed by Lenovo and trusted by the operating system (via authenticode↗). This means we cannot directly import one of the RPC client DLLs and make the call ourselves. You can read more about the authorization here↗.
This can be bypassed by making a trusted Lenovo binary our RPC client, either via, for example, DLL sideloading or shellcode injection. In both cases, our custom code will end up inside the trusted process, spoofing the PID of the RPC client. More on this in Tooling.
The Add-Ins #
Vantage is not shipped with all features baked in. It uses a plugin/add-in system that dynamically loads code based on your computer model. This means, for example, a non-gaming computer will not get gaming-specific features inside Vantage. Which add-ins you get is determined by the MTM value of your device, a Lenovo internal product identifier.
Vantage will download the list of available add-ins from Lenovo upon launch. You can do the same with:
curl https://filedownload.csw.lenovo.com/enm/vantage30/service/ConfigService/stable/x86.xml -H "User-Agent: VantageService/4.3.50.0" > addins.xml
If you parse this XML, you’ll get quite a lot of useful information. For example, you can already see within the runAs property, which add-in will run elevated (system) and which add-in runs as the logged in user (user). You can also see the filename of the cab file, which contains the add-in data. The final download link for an add-in can be assembled as follows:
https://filedownload.lenovo.com/enm/vantage30/packages/Addins/{name}/{version}/{cab_file}
This enabled me to download almost2 all add-ins, decompile the C# code, and analyze the add-ins statically.
Add-ins are installed into C:\ProgramData\Lenovo\Vantage\Addins, with each add-in getting a subdirectory and within that, a subdirectory for its current version. You’ll see that there is an AddinManifest.xml per add-in directory. This is a plugin descriptor and is actually quite useful to us.
Inside this XML file, we can see which contracts an add-in offers. As an example, here are the contracts exposed by LenovoSecurityAddin:
<?xml version="1.0" encoding="utf-8"?>
<Addin name="LenovoSecurityAddin" version="1.0.1.8" isRollback="false" secondaryServer="false" interactive="false" noSWFlags="false" armReady="true" prefer32Bit="false" runas="user">
  <Contracts>
    <Contract name="SystemManagement.WiFiSecurity" />
    <Contract name="SystemInformation.SecurityCenter" />
    <Contract name="Vantage.Security" />
  </Contracts>
...
There are also EventSubscription. A plugin can trigger automatic actions if certain conditions are met. This can be, for example, when a registry key changes. That is one area of research that I did not get into.
Code Patterns #
As already mentioned, most Vantage code is written in C#, so the MSIL code can be easily made readable again by using a decompiler like ILSpy↗.
To analyze the code of an add-in, check inside the add-in directory for <ADDINNAME>.dll. This is the entry point. Within this DLL, locate the ContractHandlerMap. This is of type Dictionary<string, Dictionary<string, CommandHandler>> and is found most of the time at <ADDINNAME>.Entry.Dispatcher.RequestDispatcher.ContractHandlerMap. It can look like this:
public static readonly Dictionary<string, Dictionary<string, CommandHandler>> ContractHandlerMap = new Dictionary<string, Dictionary<string, CommandHandler>> { ["Bios.Assistant"] = new Dictionary<string, CommandHandler>
{
  ["Get-HardwareInfo"] = BiosHandler.GetHardwareInfo,
  ["Get-DeviceSpec"] = BiosHandler.GetDeviceSpec,
  ["Get-SupportFunction"] = BiosHandler.GetSupportFunction,
  ["Set-SetupUtility"] = BiosHandler.SetSetupUtility,
  ["Set-InterruptMenu"] = BiosHandler.SetInterruptMenu,
  ["Set-SecureWipe"] = BiosHandler.SetSecureWipe,
  ["Do-RestartSystem"] = BiosHandler.RestartSystem,
  ["Get-LogoDIYInfo"] = BiosHandler.GetLogDIYInfo,
  ["Set-LogoDIY"] = BiosHandler.SetLogoDIY,
...
In this case, the add-in is the LenovoProductivitySystemAddin. The contract would be Bios.Assistant and a command would be Set-LogoDIY.
You can then follow the code to the CommandHandler, in this case BiosHandler.SetLogoDIY. Inside, you will see the signature of CommandHandler:
public static Response SetLogoDIY(string payload, Action<Response> progressCallback = null)
{
  LogoDIYRequest logoDIYRequest = Serialization<LogoDIYRequest>.FromJson(payload);
  LogoSettingError logoSettingError = _biosAgent.SetLogoDIY(logoDIYRequest.LogoFilePath, logoDIYRequest.DefaultWidth, logoDIYRequest.DefaultHeight, logoDIYRequest.FileHash);
...
To now get the final piece of the puzzle, check what the request is serialized into:
public sealed class LogoDIYRequest : Serialization<LogoDIYRequest>
{
  [JsonProperty("logoFilePath")]
  public string LogoFilePath { get; set; }

  [JsonProperty("defaultWidth")]
  public uint DefaultWidth { get; set; }

  [JsonProperty("defaultHeight")]
  public uint DefaultHeight { get; set; }

  [JsonProperty("fileHash")]
  public string FileHash { get; set; }
}
And now you have all the pieces required to make a request. The payload field of an RPC request in this case would be a JSON object instance of LogoDIYRequest.
{
  "contract": "Bios.Assistant",
  "command": "Set-LogoDIY",
  "payload": {
    "logoFilePath": "path/to/logo.png",
    "defaultWidth": 800,
    "defaultHeight": 600,
    "fileHash": ""
  }
}
Tooling #
Here are a bunch of tooling tips and tricks that will make your life a lot easier if you decide to analyze Vantage or its add-ins.
Simulate Lenovo in VirtualBox #
You can install Lenovo Vantage on a non-Lenovo device. However, it will not load many plugins. As explained above, Lenovo determines the add-ins you’ll get by the MTM string. This is a Lenovo-specific product identifier and is stored inside the BIOS of your computer. Considering that they can be found on Lenovo’s product pages, I wouldn’t call those secret.
With a little help from VirtualBox, we can make Vantage think it is installed on a Lenovo notebook from a specific branch or series. As already said, in the XML of the add-ins you can spot which add-in is distributed onto which device type. Select a plugin that you want to audit and check its requirements.
As an example, let’s select DeviceSettingsSystemAddin. This requires an MTM pattern of 21N9*. A quick dork with 21N9 site:lenovo.com reveals that, for example, the “ThinkBook Plus Gen 5 Hybrid” fits this requirement. Lenovo’s product page then reveals that the full model number is 21N90000GE.
You still need a few other identifiers. From the testing I did, they do not need to belong to the MTM, they just need to be valid Lenovo serial numbers. If you have a Lenovo device, you can get those via PowerShell if you are running Windows, or via sudo dmidecode -t system -t baseboard -t bios if you are on Linux.
| Script Value | Windows | Linux |
|---|---|---|
DmiSystemSerial | (Get-CimInstance -ClassName Win32_BIOS).SerialNumber | System Information -> Serial Number |
DmiBoardSerial | (Get-CimInstance -Class Win32_BaseBoard).SerialNumber | Base Board Information -> Serial Number |
DmiBIOSVersion | (Get-CimInstance -ClassName Win32_BIOS).Name | BIOS Information -> Version |
Using a simple script, we can set the required data on an existing Windows virtual machine inside VirtualBox. It does not matter if Vantage is already installed or not. On next start, it’ll fetch the plugins associated with the model you spoofed.
Script
#!/bin/bash

if [ -z "$1" ]; then
    echo "Usage: $0 <vm>"
    exit 1
fi

VM_NAME="$1"

if ! VBoxManage showvminfo "$VM_NAME" &>/dev/null; then
    echo "Error: '$VM_NAME' does not exist"
    echo "Available VMs:"
    VBoxManage list vms
    exit 1
fi

VM_STATE=$(VBoxManage showvminfo "$VM_NAME" --machinereadable | grep "VMState=" | cut -d'"' -f2)
if [ "$VM_STATE" != "poweroff" ] && [ "$VM_STATE" != "aborted" ]; then
    echo "Error: VM must be powered off"
    exit 1
fi

# System Information
VBoxManage setextradata "$VM_NAME" "VBoxInternal/Devices/efi/0/Config/DmiSystemVendor" "LENOVO"
VBoxManage setextradata "$VM_NAME" "VBoxInternal/Devices/efi/0/Config/DmiSystemProduct" "21N90000GE"
VBoxManage setextradata "$VM_NAME" "VBoxInternal/Devices/efi/0/Config/DmiSystemVersion" "ThinkBook Plus G5 Hybrid Station"
VBoxManage setextradata "$VM_NAME" "VBoxInternal/Devices/efi/0/Config/DmiSystemSerial" "REPLACEME" # Replace
VBoxManage setextradata "$VM_NAME" "VBoxInternal/Devices/efi/0/Config/DmiSystemFamily" "ThinkBook Plus G5 Hybrid Station"

# Board Information
VBoxManage setextradata "$VM_NAME" "VBoxInternal/Devices/efi/0/Config/DmiBoardVendor" "LENOVO"
VBoxManage setextradata "$VM_NAME" "VBoxInternal/Devices/efi/0/Config/DmiBoardProduct" "21N90000GE"
VBoxManage setextradata "$VM_NAME" "VBoxInternal/Devices/efi/0/Config/DmiBoardVersion" "ThinkBook"
VBoxManage setextradata "$VM_NAME" "VBoxInternal/Devices/efi/0/Config/DmiBoardSerial" "REPLACEME" # Replace

# BIOS Information
VBoxManage setextradata "$VM_NAME" "VBoxInternal/Devices/efi/0/Config/DmiBIOSVendor" "LENOVO"
VBoxManage setextradata "$VM_NAME" "VBoxInternal/Devices/efi/0/Config/DmiBIOSVersion" "REPLACEME" # Replace
Little Hacks #
Enable Logs
By default, Vantage writes almost no logs. However, since all add-ins (should) use the built-in logger, all logs are sent into the same sink. The following registry key enables verbose (trace) file logs on all services and add-ins:
[HKEY_LOCAL_MACHINE\SOFTWARE\WOW6432Node\Lenovo\VantageService\FileLogger]
"AllLogs"="Trace"
This requires a restart to trigger. The logs can afterward be found in C:\ProgramData\Lenovo\Vantage\Logs, with each service and add-in having its own subdirectory.
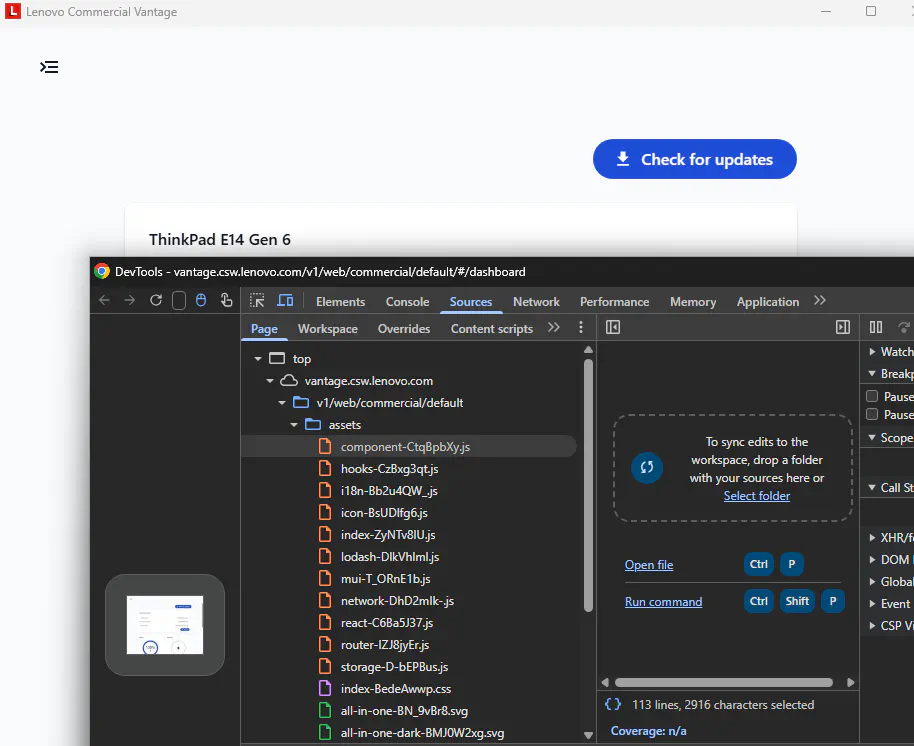
Chrome DevTools Protocol on Vantage UI
The Vantage UI app runs as a WebView2↗ app. WebView2, or more specifically Edge, supports the use of the Chrome DevTools Protocol↗. This needs to be enabled when the runtime is created, however. Luckily for us, Lenovo has a hidden option to enable this feature. Add this registry key and restart the Vantage application:
[HKEY_LOCAL_MACHINE\SOFTWARE\WOW6432Node\Lenovo\VantageService]
"DebuggingPortEnabled"="true"
Afterward, the runtime listens on port 9222.

You can connect to this debugging port by opening Chrome and visiting chrome://inspect. You may need to wait a bit for it to show up.
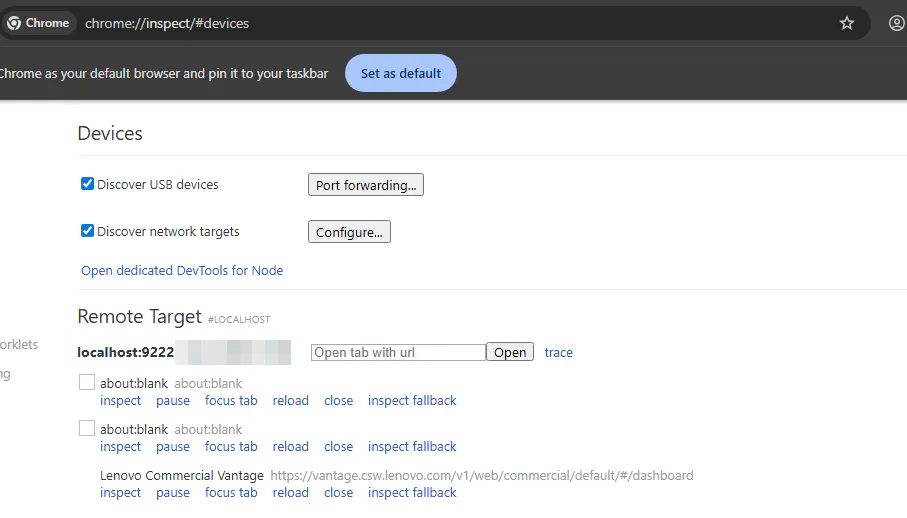
Fun fact: The dev console can also be used to make RPC calls (which will be from a trusted binary). But I recommend reading a bit further and using my custom tool :)
var client = new window.VantageShellExtension.VantageRpcClientEx;
var pl = {
    contract: "mycontract",
    command: "mycommand",
    payload: JSON.stringify({
        foo: "bar"
    })
};

client.makeRequestAsync(JSON.stringify(pl));
Frida #
I also made two scripts for Frida↗. They are especially useful for debugging when you have to escape certain payload parameters. The script rpc_dump_requests.js for example lets you see exactly how the payload you’re sending is received by the message handler. They can be found in the repo↗ and require an elevated shell.
# will dump all RPC requests to the terminal
frida -p (get-process "LenovoVantageService").Id -l .\frida\rpc_dump_requests.js

# will list all unique RPC contracts and commands received by the message handler
frida -p (get-process "LenovoVantageService").Id -l .\frida\rpc_dump_contracts.js

advantage #
To bypass the authorization checks of Vantage, I chose to go the route of process injection. The theory being that the RPC client shellcode is injected into a Lenovo process, which does not run elevated. This shellcode will then execute the RPC command for us, spoofing the sender of the command to be the Lenovo binary we just injected ourselves into. For the RPC server handler, this is enough to trust our payload.
As it would be a bit tedious to always build and then inject a new RPC client shellcode, I’ve built advantage↗, a small tool that will do that for you. It works as follows:
- The user specified the contract, command, and optionally the payload
- A payload server with this data is started on
localhost:31337
- A payload server with this data is started on
- The stage 1 shellcode stub is injected into a Lenovo process running under our own user
- This is either specified by the user via the PID or automatically determined by scanning for valid targets
- The shellcode inside the Lenovo binary will
- fetch the RPC JSON payload (stage 2) from the payload server
- make the RPC call with the JSON payload, having a PID of a trusted and signed Lenovo binary
- send the response (and optional progress data) from the RPC call back to the payload server
Using the stub that fetches the data from a payload server enables us to reuse the shellcode.
advantage can be used in either CLI mode or web mode.
Usage of advantage.exe:
  -command string
        target addin command name (required)
  -contract string
        target addin contract name (required)
  -payload string
        target command JSON payload (optional)
  -pid int
        target PID for shellcode injection (optional, default=auto)
  -targets
        list process targets
  -web
        start the web UI
CLI #
For CLI mode, specify -command, -contract, and optionally -payload and -pid. This will perform the whole process from the command line. Be careful with escaping your JSON payload. Depending on your terminal and/or shell, you need to double-escape stuff inside the JSON!
.\advantage.exe -contract "MyContract" -command "MyCommand" --payload '{"my":"payload"}'
Web #
For web mode, just run the following command. It’ll open up the web UI on localhost:31338.
.\advantage.exe -web
This has the same functionality as the terminal, plus the ability to save payloads. Also, JSON escaping is usually not a problem here.

Hunting for Vulns #
I personally only focused on add-ins that run elevated. There may be niche attack vectors in non-elevated add-ins, but since privilege escalation was my main target, only elevated add-ins were interesting to me.
In total, I found four (4) vulnerabilities. The write-ups are over at cyllective’s blog↗.
| CVE | Add-In | Type |
|---|---|---|
| CVE-2025-13154 | SmartPerformanceAddin | Privilege Escalation via File Delete |
| CVE-2026-1715 | DeviceSettingsSystemAddin | Arbitrary Registry Write (LPE) |
| CVE-2026-1716 | DeviceSettingsSystemAddin | Arbitrary Registry Delete |
| CVE-2026-1717 | LenovoProductivitySystemAddin | Arbitrary Process Kill |
What’s There to Do? #
Hidden/System Contracts
Not only the add-ins, but also Vantage itself has contracts and commands. I have not looked at those in detail, but the service runs elevated so they might be targets of value. The Frida script rpc_dump_contracts.js will show you all received contracts/commands. Among those are also the “internal” contracts.
Events
I have not looked at add-in event handlers, like RegistryChangeEvent, at all. Maybe one can find vulnerabilities inside the event subscription handlers of (elevated) add-ins.
Wrapping It Up #
This was a nice side project that started on an actual customer assignment. I always prefer those over arbitrary research projects. At the beginning, I did not imagine this rabbit hole would be that deep. But I have to stop somewhere, as there are other rabbit holes waiting to be explored. Now passing the torch to other researchers in the hopes that there are more vulnerabilities to come. If you find something interesting, maybe another tool/technique, be sure to get that information to me. I would love to add more stuff to this post.
Hats off to everybody who did previous research, to my partner in not-crime sam↗, who helped a bit with add-in parsing and the virtual machine spoofing, and to dave↗ for the peer review.
Take care
There is a 2nd endpoint with the UUID
0AFD4806-1684-4413-AF9E-355CCE12611B. This is used inLenovo.VantageService.AutoUpdatefor installing or updating Vantage. ↩︎There are four (4) add-ins (
GenericPRCTelemetryAddin,LenovoBaiyingCommercialAddin,LenovoBaiYingAddin,LenovoBaiyingWidgetAddin) which are only available from a Chinese residential IP. ↩︎